The Hated Handstand Walk
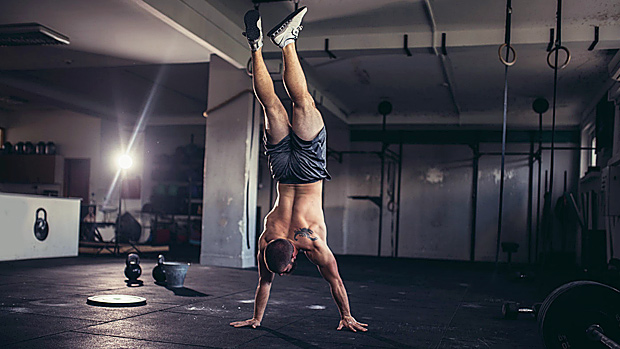
Lifters love talking smack about other lifters and their exercise choices. They'll call something they don't like (or can't do) dangerous and unnecessary. And handstand walking is somewhere at the top of their list of scary exercises.
Critics claim it's nothing more than a party trick. They say it won't build muscle or burn fat, nor will it make you better at accomplishing anything else... aside from injuring your shoulders.
Yes, walking on your hands requires a large range of motion at the shoulders and at the wrists – ranges of motion many people don't possess. And as a general rule, if you can't achieve the positional requirements of an exercise, you shouldn't do it. But does that mean no one should handstand walk EVER?
People have been walking on their hands and doing other playful, yet "risky" bodyweight exercises since the beginning of, well, exercise. Some of them even require a bigger set of balls than handstand walking.

They're difficult achievements which requires body control, skill, high amounts of relative strength, and muscular endurance. But they're not for those who aren't prepared.
Handstand walking offers several physical benefits:
- Shoulder stability: The shoulders have to fight to maintain vertical alignment and avoid extraneous motion.
- Proprioception: The hands and fingers must fine-tune your weight distribution like your feet do when walking upright.
- Anti-extension core strength: While inverted, the anterior core muscles control the position of the legs in the air. If your abs aren't engaged, you'll fall down like a house of cards. You can't be loose or weak while attempting this.
- Conditioning: As you build up to longer duration handstand walks, they actually CAN be used as part of metabolic circuits for fat loss or muscular endurance. (Hence their popularity in CrossFit.)
The qualities above can certainly carry over to other activities and exercises, too. For example, in the same way push-ups assist bench press, handstand walking is the bodyweight equivalent of overhead carries. In fact, handstand walking should benefit any activity that requires the qualities it trains. Don't be surprised if your overhead press variations go up too.
Now, you could argue that overhead carries are the safer choice for eliciting these performance benefits, and you wouldn't be wrong. Dropping weights on the floor is less complicated than dismounting from a handstand. Still, handstand walking has a few benefits that overhead carries don't:
- Universality: It can be done anywhere, without equipment.
- Confidence: Acquiring this skill is rewarding in and of itself. If you can do it you have incredible relative strength.
- Fun: Being upside down is exhilarating. From an adherence standpoint, people are more likely to engage in an exercise routine they enjoy, and learning to do these will make you feel like a kid again.
Risk can be mitigated in two key ways: self-assessment and proper progression. You can't just dive in and start practicing handstand walks on a whim. First check your joints to see if you're prepared to get inverted. The primary body regions involved with handstand walking are the wrists, shoulders, and core. Use the following stretches as assessments to see if you're ready.
For wrists, do the prayer stretch. Can you bring your hands together into a prayer position with your forearms parallel to the floor (90 degrees of wrist extension)?

If not, you'll need to gain wrist flexibility first. Build up stretch tolerance in an all-fours position for at least two minutes at a time. Start with your fingers pointed straight ahead; rotate your hands back towards your knees over time. If stretching your wrists is painful, sort that out first.

For shoulders, do back-to-wall flexion. Stand with your back against a wall. Can you keep your entire back pressed into the wall as you raise your arms and touch your thumbs to the wall overhead? If your lower back comes off the wall, it means you're substituting lumbar spine motion for true shoulder flexion.

Note: This test is relevant for any exercise where your arms go overhead, like overhead carry, overhead press, pull-up, and pulldown. You're going to need that mobility even if you're not handstand walking.
Build up overhead mobility on all fours with one arm elevated on a bench or plyo box. Hold the stretch for at least two minutes on each side. Again, if the range of motion test or the stretch causes pain, resolve the pain first.

For core, do the hollow body hold. Lying on your back, lift your legs a foot off the floor and extend your arms overhead. In this position, can you keep your low back pressed firmly into the floor for an extended period of time, like 20-30 seconds? If you can't achieve or maintain proper position, build proficiency in the bent-knee version of the hollow-body hold first.

Once you clear the self-assessments, you're ready to work through a progression of exercises to get you walking on your hands safely. Depending on your starting point and training frequency, this progression could take anywhere from a few weeks to several months.
1. Alligator Crawl
Assume a hollow body push-up position with your feet on sliders. Push yourself away from the floor and brace your core, then walk your body forward, keeping your hips square to the floor. Think of this exercise as a launching point because it loads the wrists and abs similarly to handstand walking.
2. Feet-Elevated Pike Position
Elevate your feet on a bench, plyo box, or aerobic steps and walk your hands in towards your feet as you pike your hips up towards the ceiling. This position mimics the handstand for the upper body while off-loading a percentage of bodyweight through the feet. First, practice just holding the position. Once proficient, add a march with your hands.
3. Back-to-Wall Supported Handstand
Facing the wall, position your hands a few inches from the wall and kick your legs up into the air. This can be a little nerve-wracking, so do a few easy kick-ups at first where you come right back down.
Your goal for this is to determine the minimum amount of force you need to get your legs up into the air without slamming your heels into the wall. Begin by holding the position. This will take more core stability than you think. Try to get your hips stacked above your shoulders – don't let your butt stick out. This is where a lot of people struggle. Once you have this position down, you can start adding a march with your hands.
4. Chest-To-Wall Supported Handstand
Facing away from the wall, put your feet on the wall. Walk your hands in towards the wall and walk your feet up the wall until your face is within about a foot of it. Hold the position at first, then add a march.
If you find the chest-to-wall position easier to get into than the back-to-wall one, feel free to swap the order of these two exercises in the progression.
5. Bail Out
If you're not a gymnast, not every handstand will end with a graceful dismount. Since you can't always control the direction you fall, practice coming out of the handstand in many ways, including a forward roll. From the chest-to-wall supported handstand, lower yourself down to the floor slowly and roll forward to seated.
6. Free-Standing Handstand
Kick up into a handstand without the support of the wall. At first, you'll inevitably find yourself repositioning your hands constantly to maintain balance. It's not necessary to achieve a completely static hold prior to advancing to handstand walking. A static handstand is arguably more difficult than handstand walking.
You can also do the free-standing handstand in the back-to-wall position, simply removing your legs from the wall and tapping with your heel when needed.
7. Free-Standing Handstand Walk
Kick up into a handstand and go for a walk. Try to keep your legs straight up in the air, like a gymnast. They'll likely come forward a bit to help maintain momentum in the direction you're walking. That's fine, but avoid letting them come so far forward that you lose integrity through your core.
Choosing to handstand walk – or to do any exercise – boils down to weighing the risks and rewards on a case-by-case basis. The next time you hear someone make a blanket statement about an exercise being injurious or dysfunctional, remember this:
Injuries are often caused by doing too much too soon. If you build up to a given range of motion and load gradually, the body will adapt and actually become more resilient.
The functionality of an exercise varies from one person to the next. To paraphrase a quote from Nick Tumminello, if an exercise helps you achieve your goals, then it's functional for you.

