The purpose of a warm-up is to prepare your body for work, perform better, and reduce the risk of injury. A good warm-up is simple and time efficient. This protocol includes seven easy exercises that prime your body without wasting your time. Do these before you get under the iron.

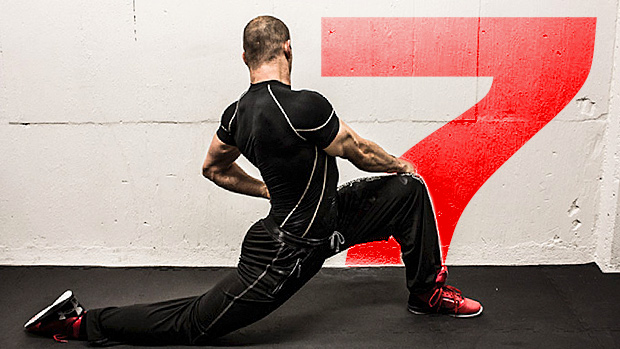
Stretching the hip flexors (the front or anterior hips) will help you move better in general. It'll also remove the "extensor block" which happens when tight hip flexors act as a brake for hip extension.
This stretch makes it easier to activate and train the glutes as well. It'll help you increase mind-muscle connection with your glutes, especially if you've been sitting for a long time before your workout.
How to Do It
- Start in a half-kneeling position with your left leg in front of you.
- Push your hips forward and activate your right glute. The knee should be directly over your heel.
- Grab the left knee with your right hand and slightly rotate the upper body and hip toward the left. This will place the hip flexors on a great stretch. The twist will also reduce the typical compensation of "rotating away from the stretch" as you might automatically start to do.
You'll see in the photo that my hips are pushed forward. That's intentional. Some recommend staying completely vertical with the spine while bracing the abs and glutes in this position. That's fine. However, I prefer a deeper stretch (more in the direction of doing front splits). Do what feels best.

The glute bridge is one of the most effective exercises to activate the glutes. It's also one of the simplest. Glute activation will always increase your performance potential in the squat, deadlift, and all lower body training, including sprints and jumps. It'll also increase your ability to stabilize your pelvis and lower spine during lower body exercises, which can prevent low back pain and injury.
The one-legged version will activate the anti-rotation capacity of your core muscles. This will also increase hip stability in functional movements.
How to Do It
- From a supine (lying on your back) position with your arms overhead and knees bent, simply contract your glutes, then press your hips up.
- Hold the contraction in top position for 1-2 seconds before you get back down.
- A common mistake is to place the feet too far in front of your hips. This will activate the hamstrings to a higher degree. If your hams are taking over, make sure you place the heels closer to you.
Use the arms-over-head position to get a slight mobilization effect for the thoracic spine and chest muscles. Everything counts!

The side lying hip abduction will activate the gluteus medius, which is a key muscle for hip and knee stability. It'll help to stabilize the knees, pelvis, and low back during squats, and can improve your balance in single-leg exercises.
It can prevent knee pain and knee injuries related to strength training, but also running, jumping and cutting. If your knees are caving in during all kinds of movements, you need to do a little more to train the hip, especially the gluteus medius.
How to Do It
- Start in a side lying position with your lower leg bent for stability.
- Raise the top leg to about 30-40 degrees and hold the position for 1-2 seconds before lowering it to the starting position.
- Make sure you create the movement from the hips and not from your lower back (don't let the hip move toward your head).
- Try placing your thumb on the glute medius – the top back area of your hips – to feel whether you're using the right muscle. This slight touch can actually help with activation, since touching a muscle can increase the mind-muscle connection.


Mobilizing the thoracic spine in extension and rotation will instantly increase your upper body mobility. It'll help you with all pressing and pulling exercises.
The increased mobility will make it easier for you to position your shoulder blades for optimal upper-body power generation. Your pressing, throws, and strikes will benefit. Better positioning of the shoulders improves stability, which means better performance and injury prevention.
How to Do It
- Starting on all fours, place your right hand behind your head.
- From here move the elbow diagonally toward your left knee. The movement should primarily come from your upper back and shoulder.
- From the bottom position, reverse the movement and raise the elbow as high as you can. Make sure to press the left hand and arm into the ground (protract the shoulder) to increase upper body stability. Let your eyes follow the elbow at all times to get the neck into the game.

The floor slide will dynamically stretch the pecs and the front of your shoulders. It'll activate the often dormant upper back and shoulder-stabilizing muscles. You need to wake these up if you're training upper body! It'll also train you to depress and retract the shoulder blades. This position has huge carryover to exercises like rows and pulldowns, but also the bench press and squat setup.
How to Do It
- Lie on your back with the arms angled up to about 45 degrees.
- Start the movement by pulling the elbows down towards your hips, like a lat pulldown, while lightly pressing the forearms into the ground at all times.
- Press your arms back up, like a shoulder press, to start position, and repeat.


This will activate the serratus anterior, a very important shoulder/upper body stabilizer. It'll also directly make the chest, delts, and triceps ready to perform, both vertically (shoulder press), and horizontally (bench press). It'll even activate the anterior core (keep the abs engaged). Done right, you'll eliminate the need for front planks during your warm-up.
How to Do It
- Start in a push-up position with wide placement of your feet, and your hips high.
- Instead of going straight down like a normal push-up, you'll go down and forward at the same time. Think about reaching forward with your forehead. Go as far as possible. Doing this sets you up for diagonal pressing patterns.
- The movement back to the start will therefore be a hybrid of a vertical and horizontal press, warming-up the essential pressing muscles.

The squat to stand provides a great stretch and dynamic warm-up for the whole posterior chain, especially the hamstrings. It opens up the groin/adductors and prepares you for the bottom position of a squat. The exercise can also be used as a learning tool for squats.
By adding rotation into the mix (optional), you get a great mobilizing effect of the whole spine as well.
How to Do It
- Start in your regular squat stance, then bend over to grab your toes or ankles.
- Push your hips down while simultaneously pressing the knees outward. Keep your arms completely straight and press your chest up to activate your upper back at all times.
- The way you go down is similar to a deadlift setup, where the arms and upper back act as a fulcrum and your hip movement acts as a wedge. You're doing this right if your whole body feels really tight as you press the hips down.
- Press the hips up again until you feel a great stretch in the hamstrings. You don't have to straighten the knees completely. Try to avoid too much flexion in the lower back.
- To add rotation, let go of one foot in the bottom position and raise the arm as high as comfortably possible. Lower it and take a new grip, then do the same with the opposite arm. Raise the hips back up and repeat.
- How long do I hold each stretch? Between 30 and 60 seconds.
- How many times should I do each exercise? Do 10 reps for the exercises that aren't static stretches. For unilateral exercises, do 10 reps per side.
- How long should this take me? Total time is about 5-8 minutes.
- How many rounds should I do? As a general warm-up, one round is enough.

