I've been involved with bodybuilding for 50 years. When I close my eyes and think back on the people who influenced me most, it's not Jay Cutler, Ronnie Coleman, or even Arnold Schwarzenegger – all of whom won the Mr. Olympia.
It's the Golden Age physiques of Clancy Ross, Steve Reeves, George Eiferman, Red Lerille, and Boyer Coe – all winners of the AAU Mr. America contest.

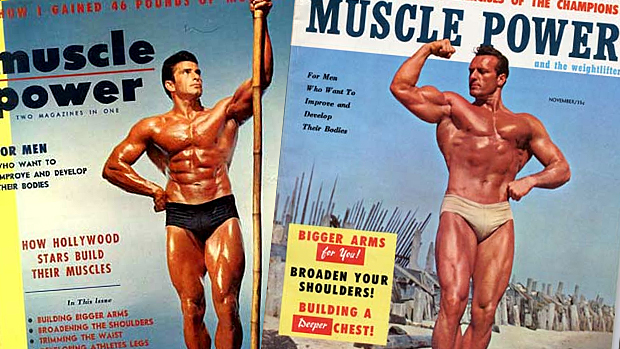
Clancy Ross won the Mr. America in 1945. From then until 1963, Ross appeared on the covers of more than 40 magazines such as Muscle Power, Your Physique, Strength & Health, and IronMan.
Many of the training tips that caught my attention as a teenager seem lost or forgotten by today's bodybuilders. It's a shame because there's a treasure trove of muscle-building insight that lies in waiting for those who study history. Sometimes you have to look back to move forward.
Here are five old-school practices that, when properly applied, can add new life to your training.
Before skinfold caliper measurements, underwater weighings, and electrical impedance readings became popular to determine percentage of body fat, old timers had an interesting way to check their leanness. The test involved keeping a periodic record of the differences between the relaxed and contracted upper-arm measurements.
Before a workout and using a plastic tape, here's what they'd do:
- Relax the arm and measure the circumference midway between the elbow and tip of the shoulder with the arm hanging away from the body. Record the number to the nearest 1/16th of an inch.
- Flex the arm and measure it at right angles to the bone around the largest part of the contracted biceps with the upper arm parallel to the floor. Record the contracted arm to the nearest 1/16th of an inch.
- Determine the difference between the relaxed and contracted measurements.
If you're trying to get leaner, or just out of curiosity, you should apply the same guidelines to your arm. Over several weeks, if you're getting leaner, the differences between your relaxed and contracted upper-arm measurements will get greater. If you're getting fatter, the differences between the two will get smaller.
The reason one goes up and the other goes down is the fact that... you can't flex fat! Only muscle contains contractile tissue.
Most of your noncontractile fat is stored directly under your skin, with thicker layers around your hips and midsection. When your percentage of fat is reduced, it's reduced to a greater or lesser degree from all over your body.
Having 1-1/2 inches between the two measurements puts you at the approximate 10% level of body fat. A greater number is exceptional. The largest difference I've ever measured was on the arm of Casey Viator, who won the 1971 AAU Mr. America. Casey's right arm was 17-1/8 inches relaxed and 19-5/16 inches contracted – which amounted to 2-1/4 inches between the two numbers.

His body fat was 3%. When Viator raised his arms and contracted them, his biceps and triceps seemed to explode – which is no exaggeration.
By keeping accurate records of the differences between your relaxed and contracted arm measurements, you now have a simple way to monitor your leanness and fatness.
You almost never see the ribcage development on bodybuilders today that you did on the bodybuilders of 40 to 50 years ago. Most of the current champions tend to concentrate more on their pectoral muscles and less on their ribcages. It's time to recognize that enlarging the ribcage can do more to deepen the chest than thickening the pectorals can ever do.
When I first started weight training in 1958, I wanted to gain body weight. Every piece of literature I could find on the subject always discussed the importance of stretching and expanding your ribcage so your torso could support more muscle. The suggested way to do this was by doing squats, immediately followed by straight-arm pullovers. Some people called them breathing squats and breathing pullovers.
Well, let me tell you, those squats and pullovers were instrumental in me putting on 25 pounds of body weight and five inches on my chest – all in one summer. I also added a couple of inches on each of my thighs.

One of the secrets to getting great results was not only combining squats with pullovers, but also the specific way that you were supposed to breathe during the exercises. Let's examine each movement.
Breathing Squats: Place a barbell on a squat rack and load it with a moderately heavy weight. Position the bar behind your neck across your trapezius muscles and hold the bar in place with your hands. Straighten your legs to lift the bar off the rack and move back one step. Place your feet shoulder-width apart, toes angled slightly outward.
Take a deep breath and lower your body until your hamstrings firmly come in contact with your calves. Return smoothly to the top position and exhale. Take another deep breath and continue for 8 repetitions. It's important that you inhale and exhale only once per repetition.
Don't stop just yet, however. Keep the barbell on your back. You must progress to the next phase.
Beginning with the 9th repetition, take two deep breaths between repetitions rather than only one. Continue for another 7 repetitions, if possible, or 15 total reps.
As soon as you finish your final repetition, immediately do breathing pullovers.
Breathing Pullovers: Pullovers are a terrific ribcage exercise, especially if you do them after squats. Again, you'll be emphasizing the same breathing pattern.

Lie crossways on a low bench. Hold a dumbbell on one end with your palms on the inside handle area of the weight plates. Extend your head slightly off the bench, with the dumbbell over your chest and your elbows straight.
Take a deep breath and lower the dumbbell behind your head and try to touch the floor. Keep your arms as straight as possible. As the dumbbell approaches the floor, drop your buttocks a little while keeping your feet together and legs relatively straight. You'll have a slight arch in your middle and lower back and you'll feel an unusual pull throughout your torso in this bottom stretch. Lift the dumbbell slowly back to the over-chest position.
Practice one deep breath during each of the first 8 repetitions, and two deep breaths – and hold the second one – during reps 9-15.
It'll require several learning sessions using moderate resistance to get the hang of breathing squats and breathing pullovers, but within two weeks you should be able to progress to heavier and heavier weights in both.
Note: You may substitute the leg press machine for the squat. Also, in place of the squat, some trainees experience good results using trap-bar deadlifts or regular deadlifts. Just be sure and breathe in the same style.
For the intermediate bodybuilder, your goal is to perform the breathing squat with 225 pounds and the breathing pullover with 45 pounds. Keep working hard and try to increase the resistance while adhering to strict form.
When you can do the breathing squats with 315 pounds and the breathing pullovers with 65 pounds – both for 15 repetitions – you'll have a ribcage that'll be wide, thick, and deep.
Are your calves stalled at a certain level of development? Here's a neat technique I learned from Dan Ilse, who won Mr. Texas in 1961. Dan was 5'10" tall and weighed 200 pounds – and he had impressive, diamond-shaped, 18-inch calves.
Ilse thought the key to stimulating calf growth was to pay more attention to the stretched position than the contracted position. He emphasized the stretch in a unique way. He divided the standard calf raise into two parts: the bottom half and the top half. He began his set by doing 12 bottom-half reps; followed by 12 top-half reps; followed by 12 bottom-half reps.
Overall, he performed twice as many bottom-half reps as he did top-half reps. When he could do 15 reps in each of the three divisions, he upped the resistance.
Try the bottom-focused movements the next time you do calf raises and see if they don't make a difference in your growth stimulation.

Note: You'll want to refer back to this photo in the next section because the calf raise is being performed on the Omni Multi-Exercise machine. This machine may also be used for negative-only chins and dips.
Before 1972, few bodybuilders paid much attention to the negative, eccentric, or lowering phase of an exercise. We performed the positive or raising part of each exercise with great concentration. The negative phase, however, was done haphazardly and sometimes just dropped.
In the spring of 1972, an article in IronMan startled bodybuilders by challenging them to not think in terms of how much can you lift, but in terms of how much you can lower. Today, almost every bodybuilder has used "negatives" at the end of a set.
Negatives are done in several ways, usually with a spotter. After the last rep, for instance, a spotter helps lift the weight and the trainee continues the lowering (since he's 40% stronger negatively than positively) for several more reps. Or instead of assisting with the lifting at the end, the spotter supplies hand resistance carefully to the barbell or machine for another repetition or two.
A far more productive style of performing eccentrics, but mostly neglected now, involved what was called negative-only training – where you eliminate the positive phase of the exercise and honed in exclusively on the negative.
Two movements to which you can easily apply this principle include negative-only chins and dips. You can position a chair or bench under a chinning bar or parallel bars and attach a dumbbell around your waist with a sturdy belt.
Use the chair to raise yourself up and completely eliminate the concentric portion of the movement. In the case of the chin, you step on the chair and start the movement with your chin over the bar. And, with the dip, you step up to the starting position (arms straight) and lower yourself slowly.
At the conclusion of the eccentric component of the lift, you step up and repeat it.
To successfully apply the negative-only chin and dip, it's important to understand the following:
The object of a negative-only exercise is to lower the weight slowly, very slowly, but without interrupting the downward movement. At the start of a negative exercise, you should be able to stop the downward movement if you try... but don't try. After 6 or 7 reps you should be unable to stop downward movement no matter how hard you try. However, you should still be able to guide it in a slow, steady, smooth descent.
Finally, after 2 or 3 more repetitions you should find it impossible to stop the weight's downward acceleration. At that moment, you should terminate the exercise.

Properly performed negative exercise, therefore, assures more complete exercise for the involved muscles because the resistance is never thrown. It always moves at a smooth, steady pace and, as a result, provides more thorough involvement of the muscle fibers.
Old-school bodybuilders cared about muscular size, but they also realized the importance of remaining symmetrical. As a consequence, they often took circumference measurements – of their neck, upper arms, forearms, chest, waist, hips, thighs, and calves – before their workouts.
All the measurements, with the exception of the upper arms and forearms, are taken with the body relaxed. The upper arms are recorded with arms flexed at shoulder height and the biceps contracted. The forearms are measured with the elbow extended and the fist clenched and forearm muscles tensed. Old-school bodybuilders also calculated an interesting size ratio: body weight in pounds divided by height in inches (see the first numbers in the chart below).
Okay, so you take an accurate set of body measurements. What do they mean and how do they compare with old-school bodybuilders?
The expert on such comparisons was a bodybuilder turned historian, David P. Willoughby. Willoughby authored many articles on bodybuilding, but his crowning jewel was a 700-page book titled The Super Athletes (1970). A condensed version of Willoughby's interesting chart is presented below:
Ratio of Measurement (Pounds/Inches)
| Small 2.00 |
Medium 2.40 |
Large 2.87 |
Maximum 3.67 |
|
|---|---|---|---|---|
| Neck | 14.38 | 15.81 | 17.40 | 19.80 |
| Upper Arm |
13.48 | 14.85 | 16.35 | 18.60 |
| Forearm | 11.24 | 12.39 | 13.62 | 15.49 |
| Chest | 37.40 | 41.25 | 45.30 | 51.60 |
| Waist | 28.10 | 30.93 | 34.00 | 38.70 |
| Hips | 33.65 | 37.12 | 40.75 | 46.50 |
| Thigh | 20.20 | 22.28 | 24.48 | 27.90 |
| Calf | 13.47 | 14.53 | 15.94 | 18.60 |
Excellent size and symmetry, according to Willoughby, would be achieving measurements that correspond to one of the vertical listings under the Ratio of Measurement headings: Small, Medium, Large, and Maximum.

Most champion bodybuilders have measurements that fall between the Large and Maximum ranges. Remember, champion bodybuilders have unusual genetic potential for developing large muscles. Regardless of what your measurements are, you should strive toward symmetry, or having good balance in your body proportions.
From time to time, re-measure for changes and note your size and symmetry improvements.
Bodybuilding history can be interesting, revealing, and meaningful. It can most definitely lead to better training results.
Check your leanness, try some breathing squats and pullovers, perform a set of bottom-focused calf raises, hit those negative-only chins and dips, take your measurements, and assess your symmetry.
Isn't it time for you to study the past to accelerate to the future?

